
Section geometry
Define concrete cross-section outlines using parametric templates or custom polygonal drawing, including voids for hollow sections.
Overview
Every ACS analysis starts with the section geometry — the concrete outline that defines the cross-section shape. The geometry determines gross section properties and provides the boundary within which reinforcement is placed.
ACS offers two approaches to defining geometry: parametric templates for standard shapes, and manual vertex editing for custom sections.
Parametric templates
Templates generate section geometry from a small set of dimensions. Select a template type from the dropdown above the canvas, enter the required dimensions, then press Enter or click Apply Template.
The section-type tiles are a single keyboard-operable group: Tab moves into the group and lands on the current type, the arrow keys move the selection between types, and Enter or Space selects the focused one.
Available templates
| Template | Parameters | Description |
|---|---|---|
| Rectangular | , | Solid rectangular section |
| T-beam | , , , | Web with top flange |
| L-beam | , , , | Web with asymmetric flange |
| Circular | (or ) | Solid circular section — dimension directly by diameter or radius |
| Hollow circular | , (or wall thickness ) | Ring section with linked diameter and wall-thickness dimensions |
| Box girder | , , , , , | Closed box section |
| I-beam | , , , , , | Double-flanged section |
| Trapezoidal | , , | Section with sloped sides |
Template parameters
All dimensions are in millimetres. Common parameters:
| Parameter | Symbol | Description |
|---|---|---|
| Width | Overall section width | |
| Depth | Overall section depth | |
| Web width | Width of the web (for flanged sections) | |
| Flange width | Width of the flange overhang | |
| Flange thickness | Depth of the flange | |
| Web thickness | Thickness of the web (for box and I-sections) |
You can apply a template and then manually adjust vertices afterwards. The template metadata is preserved, so you can re-apply the template with different dimensions at any time.
Circular and hollow-circular dimensioning
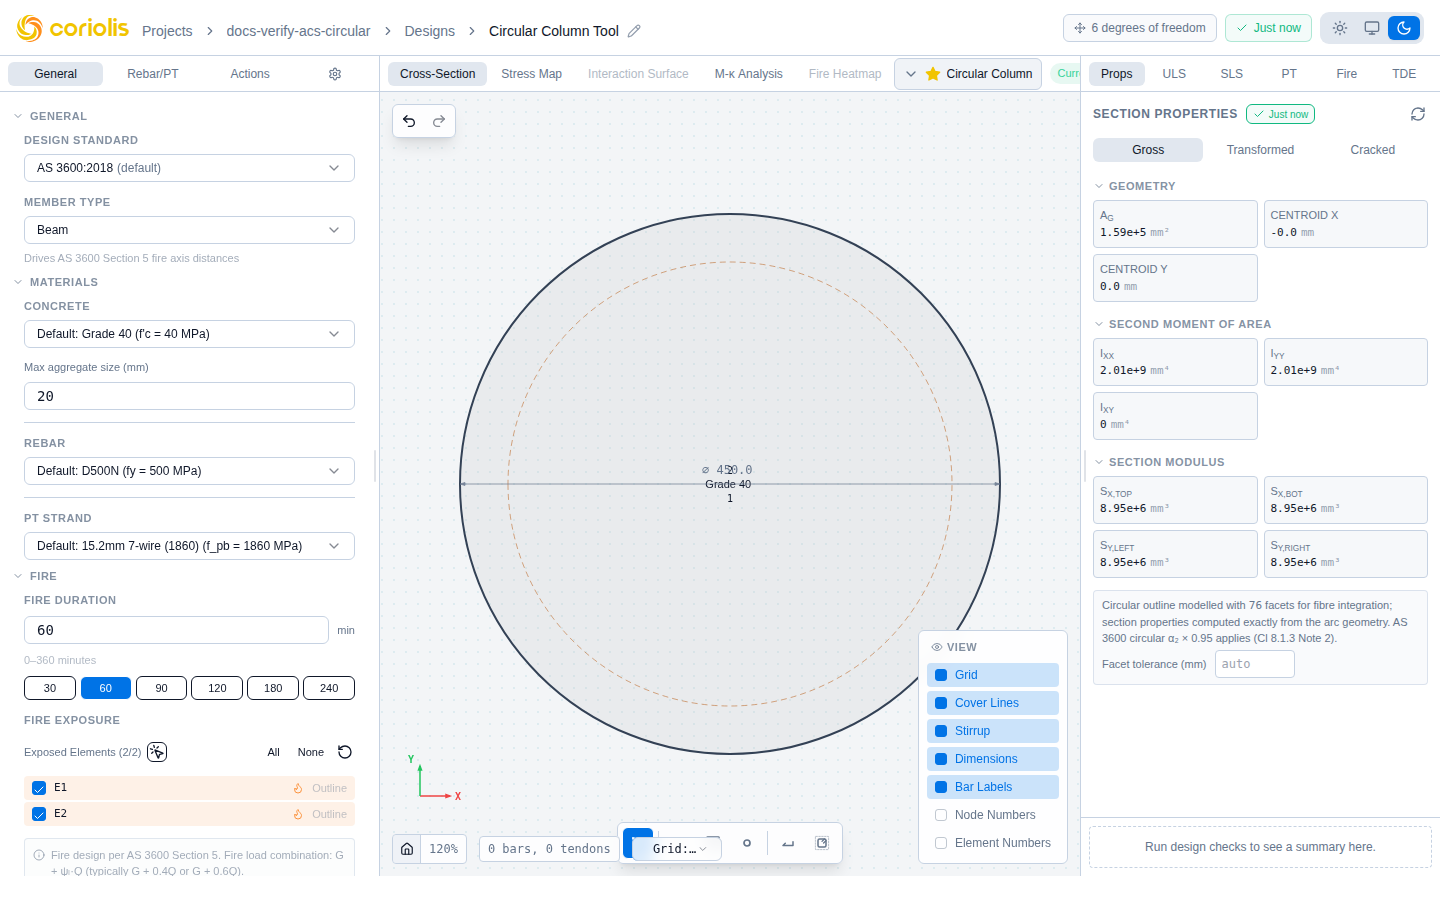
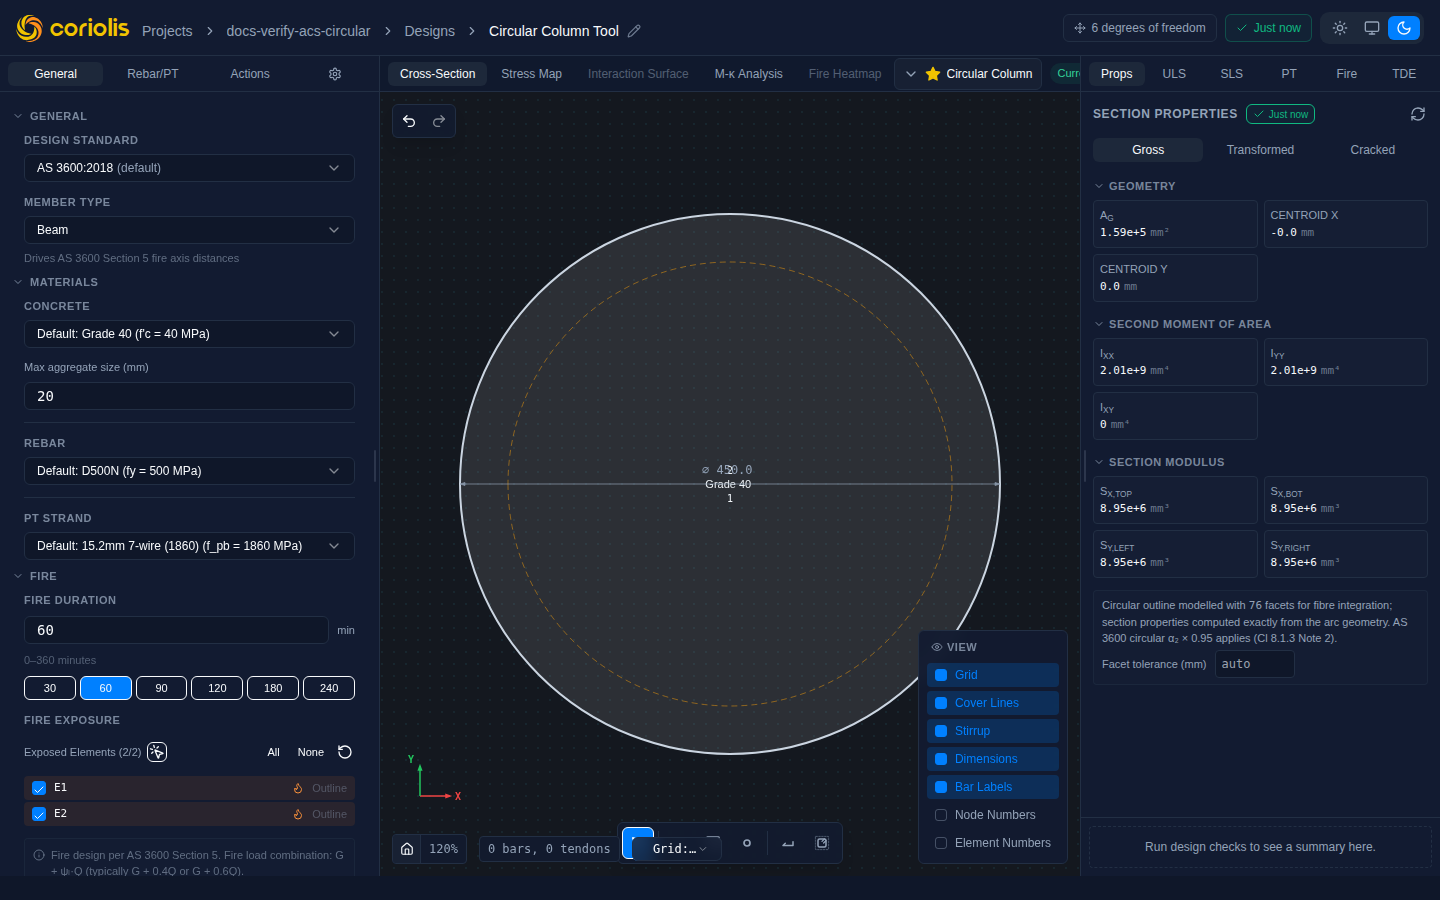
Circular and hollow-circular sections expose dimension annotations directly on the canvas, allowing you to resize them in place without reopening the template dialog. Click any annotation label to edit its value; the outline updates immediately.
Solid circular sections
A solid circular section displays a single ⌀ (diameter) annotation. Click the label to type a new diameter value. The radius is the canonical stored value; the annotation converts to diameter for display.
Hollow circular sections
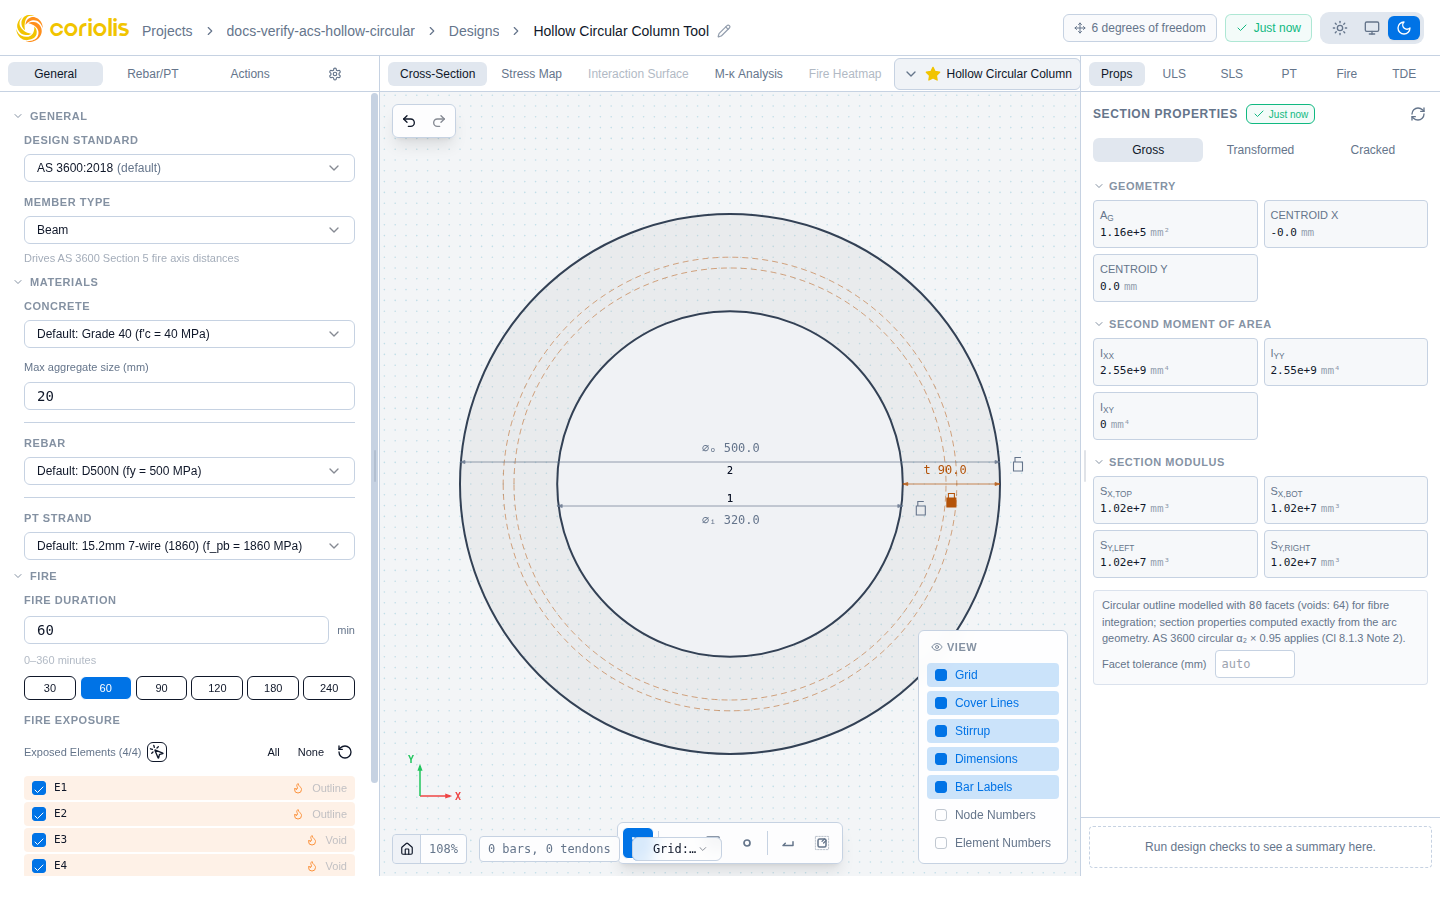
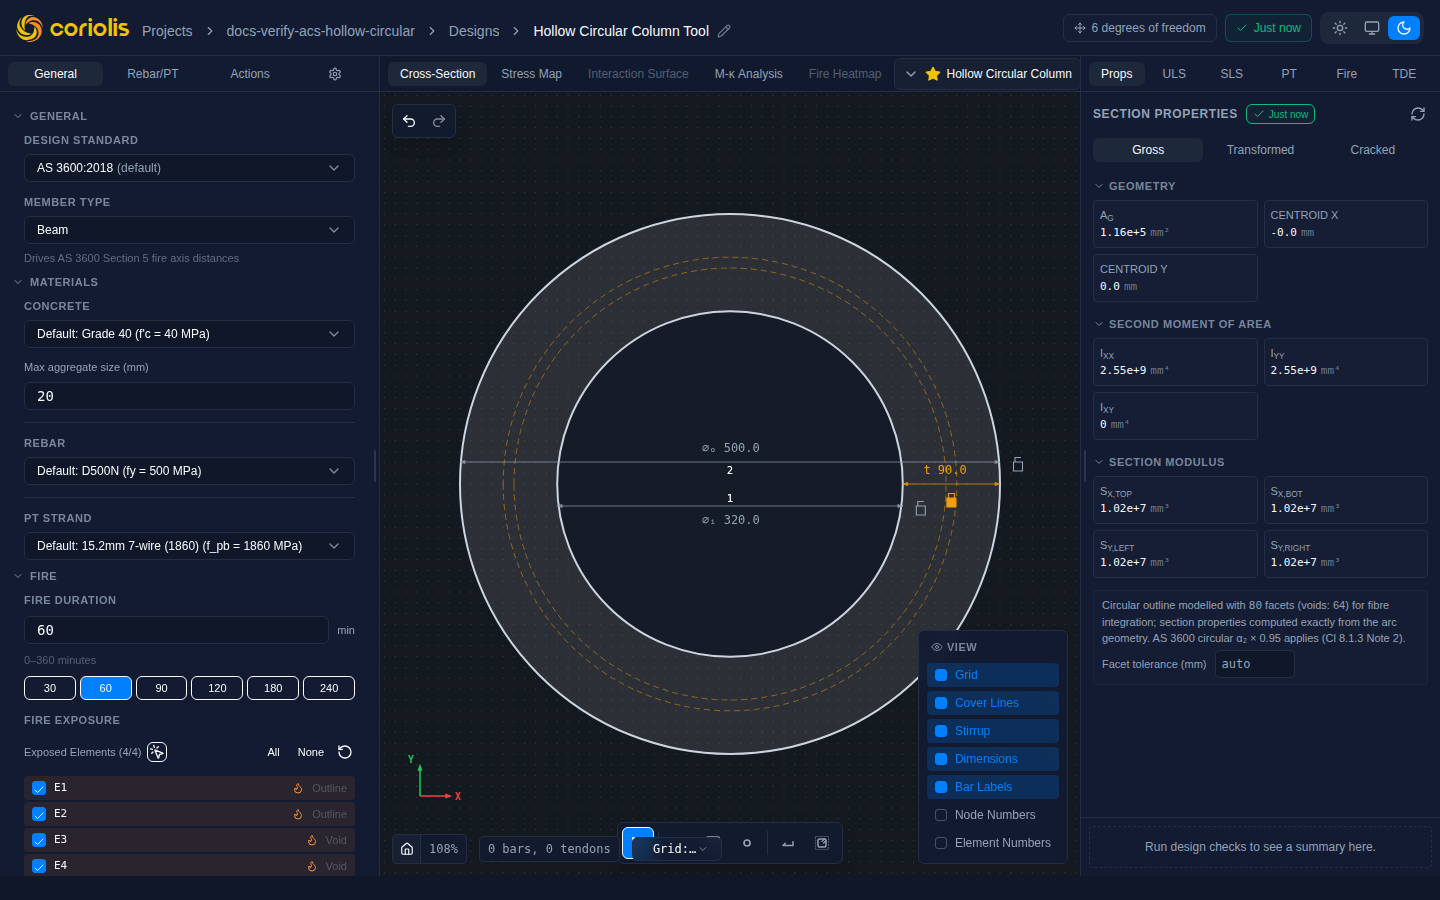
Hollow circular (ring) sections expose three linked dimensions simultaneously:
| Label | Symbol | Meaning |
|---|---|---|
| ⌀ₒ | Outer diameter of the section | |
| ⌀ᵢ | Inner diameter of the central void | |
| t | Wall thickness, where |
Because the three values are linked — specifying any two determines the third — each dimension carries a padlock icon that controls which value is held constant when the others are edited:
- Lock ⌀ₒ (outer diameter fixed): editing ⌀ᵢ or grows or shrinks the void while the outer boundary stays in place. Use this when the outer formwork dimension is set.
- Lock ⌀ᵢ (inner diameter fixed): editing ⌀ₒ or changes the outer ring while the void stays the same size. Use this when a duct or opening must not change.
- Lock (wall thickness fixed): editing either diameter shifts both, maintaining a constant wall. Use this for sections designed to a minimum cover or precast wall specification.
Click the padlock icon to toggle which dimension is locked. The active lock is highlighted; the other two dimensions become editable.
Custom geometry
For non-standard shapes, draw the outline directly on the canvas:
- Vertices define the section boundary as a closed polygon
- Drag any vertex to reposition it (snaps to the active grid)
- The outline must be a simple polygon (no self-intersections)
Grid snapping
Configure the snap grid size from the canvas toolbar: 1, 5, 10, 25, or 50 mm. Vertex positions snap to the nearest grid point when dragged, ensuring clean geometry with round coordinates.
Arc edges
Outline edges can be curved — converted from straight line segments to circular arcs. Arc edges are useful for sections with rounded corners, curved flanges, or any non-polygonal geometry. The arc is stored as a bulge value on the leaving vertex of the edge; all section property calculations use the exact arc formulas rather than a polygon approximation.
Converting an edge to an arc
Click any outline edge on the canvas to open the edge radius popover. Enter a radius in the Radius field (minimum = half the chord length, since a semicircle is the tightest arc that spans two points), choose Out (arc bulges away from the section interior) or In (arc bulges toward the interior), then click Set radius.
To revert an arc edge back to a straight segment, open the popover and click Straighten.
Arc dimension annotations
Each arc edge displays two annotations on the canvas:
| Label | Symbol | Editable? | Meaning |
|---|---|---|---|
| R value | Yes — click to edit | Arc radius in millimetres | |
| θ value° | Read-only | Included angle of the arc (sweep angle) |
Click the R label to enter a new radius inline. The arc updates immediately. The θ label is computed from the radius and chord length and cannot be edited directly — to change the sweep angle, adjust the radius or move the vertices.
A padlock icon appears alongside the R label. When the padlock is open (default), the radius floats freely when neighbouring dimensions or angles are edited. Click the padlock to lock the radius.
Editing the arc radius
Click the R label on an arc edge annotation to open the inline radius editor. Type a new radius and press Enter or click away.
Feasibility constraints: the radius must be at least half the chord length (the chord connects the two endpoints of the edge). If you enter a value below the minimum, the edit is refused and the arc reverts to its previous radius — ACS never silently clamps to a nearby value. The error tooltip states the minimum allowed radius for the current chord.
When a radius edit is refused, the section is left unchanged. Adjust the dimension by either entering a larger radius or moving the bounding vertices to shorten the chord.
Locking the arc radius
The padlock next to the R label controls whether the arc radius is held fixed when the chord polygon is reshaped by constraint-solver edits (edge-length or vertex-angle changes).
- Unlocked (default): when a straight-edge length or vertex angle is edited, the arc’s included angle θ is preserved and the radius floats to match the new chord length.
- Locked (amber padlock): when a straight-edge length or vertex angle is edited, the radius is held fixed and the solver re-derives the bulge for the new chord. If the new chord is too long for the locked radius (the chord would exceed the arc’s diameter), the edit is refused and the outline reverts.
Arc-aware constraint solver
Dimension and angle edits on a mixed straight/arc outline pass through a three-phase solver:
- Chord pass — the arc edges are treated as straight segments (their chord lengths only) and the standard constraint solver adjusts vertex positions to satisfy the requested dimension or angle change.
- Bulge re-attachment — the solver re-attaches each arc’s curve to the solved chord polygon:
- Unlocked arcs receive their original bulge back, preserving θ and allowing the radius to float.
- Locked arcs have the bulge recomputed to hold their locked radius against the new chord.
- Infeasibility check — if a locked arc’s radius cannot span the new chord (chord > diameter), the edit is refused and the entire outline reverts to its pre-edit state. ACS never silently clamps or approximates — the §874 “incorrect data is worse than no data” principle applies here.
Angle annotations at arc-incident vertices are suppressed. The interior angle at a vertex where either adjacent edge is curved is not shown, because the tangent direction at a curved edge is not the same as the chord direction and displaying the chord angle would be misleading.
Lock staleness — radius locks, dimension locks, and angle locks are keyed by vertex index. If the outline vertex count changes (for example, by undoing an insert or loading a different geometry), all index-keyed locks are automatically cleared to prevent a lock from silently targeting the wrong edge.
Voids
Hollow sections (such as box girders or sections with ducts) include voids — interior polygons that are subtracted from the gross section area.
When using a template that includes voids (e.g., hollow circular, box girder), the voids are generated automatically. For custom sections, voids can be defined as additional interior polygons.
Voids affect:
- Gross section properties — area, centroid, and second moments of area exclude the void regions
- Stress distribution — the concrete stress block skips void regions during integration
- Fire analysis — void edges can be designated as fire-exposed surfaces (e.g., for a duct exposed to fire)
Coordinate system
ACS uses a Cartesian coordinate system with:
- X-axis: horizontal (width direction)
- Y-axis: vertical (depth direction, positive upward)
- Origin: typically at the bottom-left corner of the section (templates centre the section at the centroid)
All coordinates, cover distances, and bar positions are measured in millimetres.
Sign conventions
ACS follows the platform-wide canonical convention. The headline rules that apply to everything you draw and enter on this page:
- Engineer-Y-up everywhere. Bar positions, outline vertices, void vertices, cover distances, and dimension labels all use positive upward. The canvas renderer flips internally so the screen draws naturally, but the persisted geometry and the data you enter is always engineer-Y-up.
- Top face = largest , bottom face = smallest . When you see
yMax/yMinin section property output, those are physical top / bottom of the section as drawn. - Left face = smallest , right face = largest .
Every ACS canvas displays a small Y↑ X→ axis indicator in the bottom-left corner so the orientation is unambiguous.
For the full canonical (moments, stresses, curvature, strain) see Platform — Sign and axis conventions.
Related pages
- Getting started — your first section
- Reinforcement placement — placing bars within the defined geometry
- Materials — concrete and steel material properties